This super simple keto dish is both yummy and satisfying. Chicken cutlets and broccoli rabe over cauliflower rice topped with porcini mushroom sauce.
A few easy steps. You can use dried porcinis or fresh, or a combination. If using dried, rehydrate by putting mushrooms in a bowl and pouring boiling water over them. Let this sit for about 10 minutes or until softened. Remove from water and chop. In a little EVOO and butter sauté mushrooms with garlic, onion, seasoning. Over low heat, add about 1/4 cup of heavy cream (and maybe a little mascarpone?) and emulsify until you create a thick sauce and set aside.
Prepare the broccoli rabe and cauliflower rice and set aside for plating.
Dredge the chicken cutlets (we butterfly and pound the cutlets so they’re not too thick) in seasoned almond flour. Sauté the “breaded” cutlets in a little EVOO (we’re not deep frying here) until both sides are golden brown and chicken is cooked through.
To plate this I started with the rice, topped with the cutlets, topped with the porcini sauce and broccoli rabe on the side.
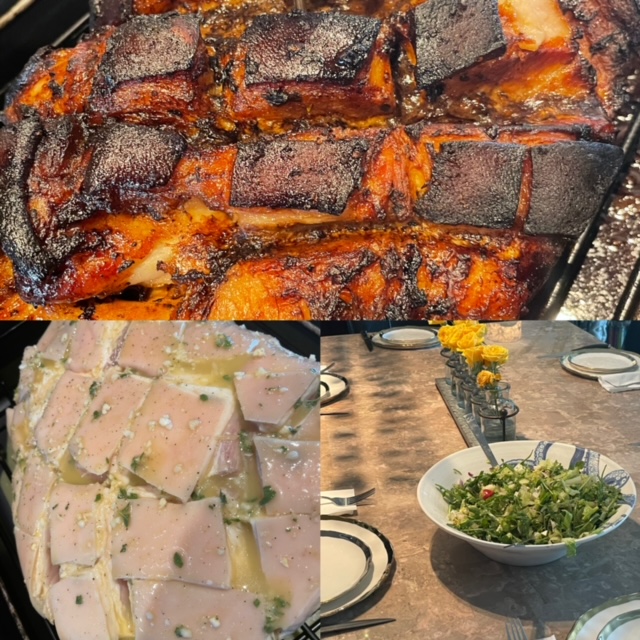
Let me start by saying that I would probably not cook Pernil for any of my Latino friends, the same way they would probably not make Sunday sauce for me. That said, it came out delicious and was a rightful payment to my friend Dana who helped with a house project. I think the smell of it cooking in the oven kept her motivated and helped us get through it quickly!
Pernil is a a large, usually inexpensive, piece of pork labeled at the supermarket as “picnic shoulder”. It’s got a large layer of skin that crisps up as it cooks and keeps the meat tender and juicy.
To start I make a marinade of orange juice (3 cups), apple cider vinegar (1/4 cup) and olive oil (1/4 cup) and a ton of minced garlic, oregano, salt, pepper and fresh minced parsley. You want to make enough marinade so that at least half of the pork is covered (you’ll need to flip the pork over after a few hours so all sides get some loving). I usually marinate this over night turning a few times during the process. I’ve tried marinating it for just a few hours and it just wasn’t as good, it really needs to go overnight.
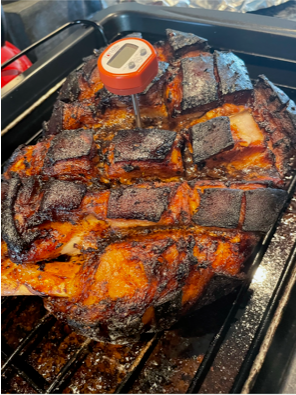
Now for the magic, using a sharp paring knife I stab several deep holes (while channeling a dark, serial killer persona) in the meat-not on the skin side-where I will place cloves of garlic deep inside to infuse the pork with flavor. Next, using a super sharp knife, I carefully cut long lines about 1 inch apart from each other across and through most of the fat layer (to the point where the skin meets the meat) and do the same on the bias to create a hatch pattern. (See pic below.)
I put this bad boy on a v-rack in my oven skin side down for two hours at 150 degrees. After two hours I flip it so the skin side is now facing up and cook for another two hours at 150 degrees. This piece of meat was about 5 pounds so you may need to adjust your cooking time depending on the size of pork you have. If you have a meat thermometer your inside temperature (which you take after the pork has rested outside of the oven for about 3-5 minutes) should be 145 degrees. (A useful meat temperature guide can be found here.) After resting I turn it over to hubby, who harnesses his inner caveman and carves this beauty up.
Nice side dishes are rice, salad, yucca, you name it!
Hubby is away so I am going crazy with putting cheese in everything!
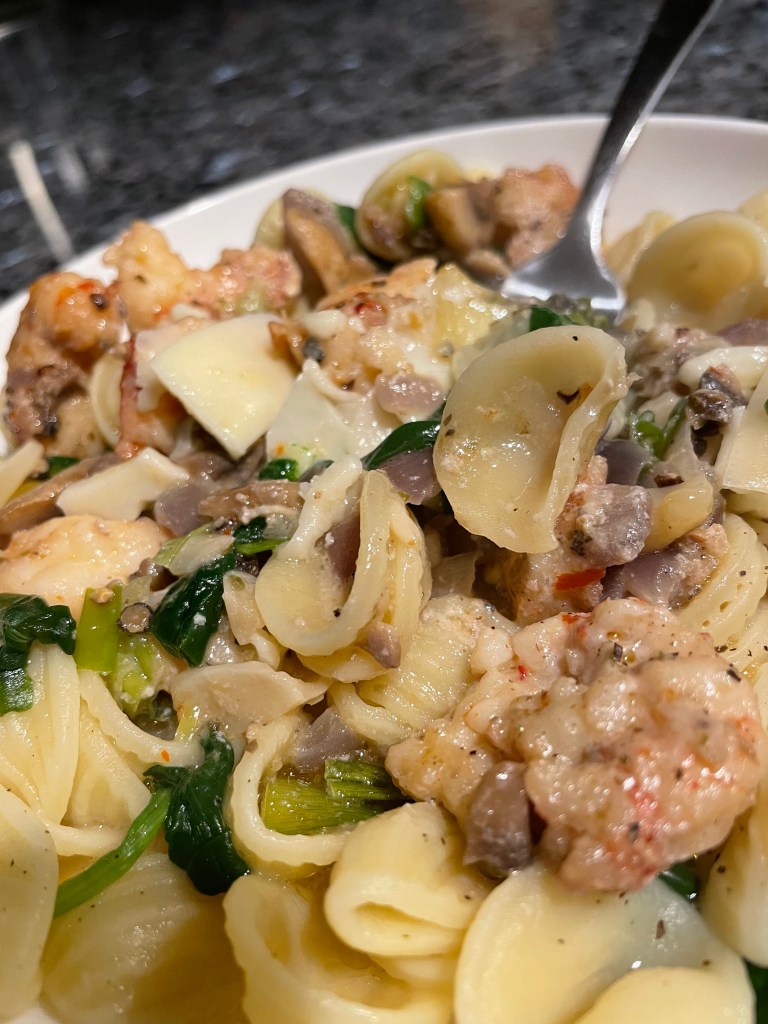
Last night was a quick orecchiette, with sautéed spinach, tons of crushed garlic cloves and red Argentinian shrimp from Trader Joes (sometimes I just don’t feel like going to the fish monger, and these tasty, frozen shrimp are a great Plan B). First get your salted water boiling for the pasta. While this is happening sauté fresh crushed garlic and the shrimp in a little EVOO until shrimp are mostly cooked, then add spinach until cook until wilted (use a large sauté pan as you’ll add the pasta when it’s cooked). When water is rapidly boiling add your pasta cook for 9-10 minutes (or until it’s cooked al dente). Save about a cup of the starchy water and strain the pasta. Add pasta to sauté pan with shrimp, garlic and spinach adding the water if you need to loosen up the mixture. Keep heat on low and mix until well incorporated.
After plating this ‘beaut I topped with red pepper flakes and as much grated cheese as I could get on the plate.
Pro-tip: Did you know that Orecchiette means “little ear” in Italian? Think about that next time you cook it – notice the shape.
I’ve been cooking, a lot. My husband encourages this by opening the wine or mixing a cocktail for me while we concoct our dishes. Recently though, he’s taken on a little mixologist hobby – Limoncello!! We have a great affection for this sweet, syrupy, flavorful liqueur since being given a generous bottle the night we got engaged in Italy at a restaurant called Le Grotte in Rome, near the Spanish Steps about a decade ago. Our waiter was so excited about the event that he let us sit there with our Limoncello well after the restaurant closed – how we got back to our hotel is still a bit of a mystery.
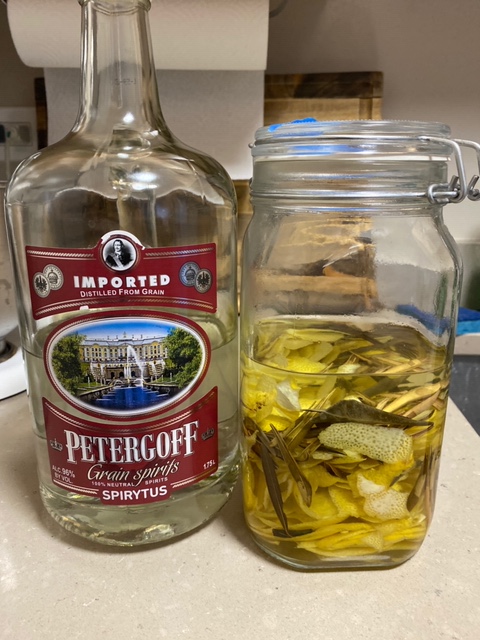
The making of the Limoncello is not a stealth process. First the procurement of ten organic (a must) lemons. Then to find olive leaves (we found these on Amazon – shocking, I know). Then the pure alcohol (see picture below) in Florida we could only find 75% alcohol but in NYC we were able to find 95%. Note that the proof is half the alcohol content.
First to peel the lemons. We have a super sharp peeler that we bought in Germany, it grabs just the top yellow rind and not the bitter white pith which you want to avoid. The peel and olive leaves (about 10) now marinate in the fridge in 25 ounces of the alcohol for 30 days. We do this in a 132 ounce Mason jar. After 30 days we add a cooled simple syrup (2lbs of sugar and 1.5 quarts of water-now you know why we use such a large mason jar). It again rests for another 30 days before being strained via a sieve into whatever bottles you choose (see our cool bottles below).
Limoncello makes for a great gift when visiting friends or for a finishing touch after a great dinner or just because it’s 2020!
We’ve recently tried the same recipe with oranges and tangerines (and we added fresh vanilla beans to make an adult creamsicle…) it was de-lish!